Next: Bootloader
Up: LBA-Linux Installation Guide
Previous: Welcome screen
Contents
Index
Subsections
Partitioning
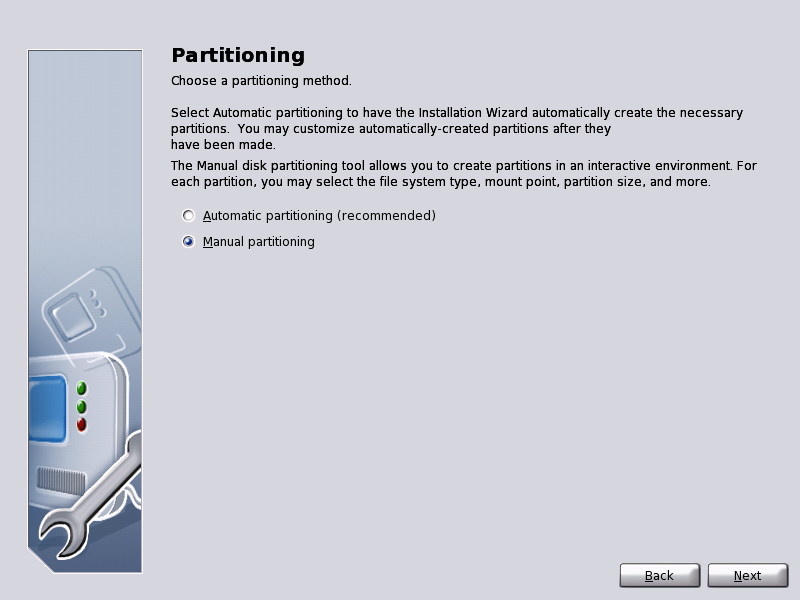
The Partitioning screen of the LBA-Linux installer allows you to partition your hard drive, either manually using a partition editor, or automatically.
Figure 2:
Selecting a partitioning method
|
|
Partitioning is important if you want your computer to support multiple
operating systems. Each operating system has its own unique method of
organizing its disk-space. In general these methods are not compatible
between operating systems. Because each partition on a hard drive is
self-contained, a single hard drive can host multiple
operating systems as long as each one receives its own partition.
Partitions are also useful for organizing the filesystem of a single operating system. You may decide to keep all the system files on one partition, your own user files and data on another, and to dedicate a third partition to hold temporary files. The advantage of this approach to partitioning is that system files on their own dedicated partition are protected from disk errors (or other catastrophes, such as a lack of free disk space) that occur on other partitions.
Manual Partitioning
The LBA-Linux installer allows you to edit disk partitions yourself, using a provided partition editor. From this editor you may create, remove and resize any or all disk parititions, as well as being able to select filesystems and mount points.
Manual partitioning is only recommend for experienced computer users who fully understand the disk partitioning process. Novices are encouraged to use Automatic partitioning.
To select Manual Partitioning:
- Click the radio button next to Manual partitioning.
- Click the Next button at the lower right of the screen.
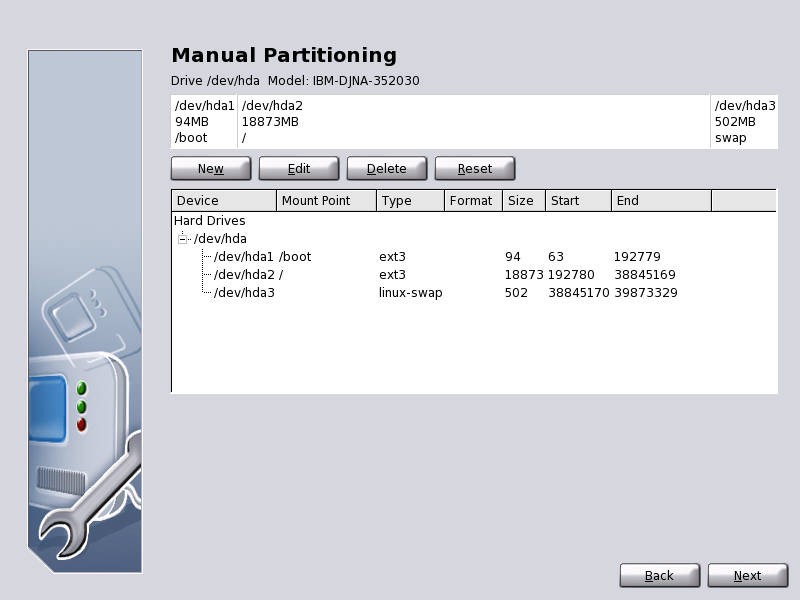
Figure 3:
The Manual Partitioning screen of the LBA-Linux Installer
|
|
A graphical representation of your existing disk partitions appears at the top of the screen as a wide bar. Partitions are marked on the bar in ascending order from left to right, so that the lowest-numbered partition is on the extreme left. Free disk space is displayed as blocks of gray color. This bar is continuously updated to reflect any changes to make to your disk partitions.
Beneath the partition bar, a row of buttons allows you to create new partitions, or modify existing ones:
- New
- Create new partitions from free disk space.
- Edit
- Modify existing partitions, changing their filesystem and mount point.
- Delete
- Remove an existing partition, creating free space on the hard disk.
All of your computer's disks and partitions are listed in the Manual Partitioning window. Information about each partition is displayed in columns:
- Device
- The Linux device name. IDE hard drives are listed as /dev/hda, /dev/hdb etc. while SCSI hard drives are labelled /dev/sba, /dev/sbb an so on. Partitions are numbered consecutively, beginning at 1, so a line reading /dev/hda2 refers to the 2nd partition of your first IDE hard drive.
- Mount point
- The point in your LBA-Linux filesystem where the partition is to be mounted. Initially, this column will appear blank. You must explicitly provide mount points for your Linux partitions, using the parition editor.
- Type
- The type of filesystem held by the partition.
- Format
- Whether or not the installer will format the partition. A check mark here indicates the partition will be formatted. You may change setting with the partition editor. Formatting removes all data from the partition. In general, you should format all newly-create partitions, but do NOT format any partitions containing data that you wish keep (for example, additional operating systems).
- Size
- The size of the partition, in megabytes (MB).
- Start
- The disk cylinder that marks the start of the partition.
- End
- The disk cylinder that marks the end of the partition.
To create a new parition from free disk space:
- Click on the New button. A window will appear allowing you to enter settings for the new partition.
- In the partition window, click on the combo box labelled Mount point. A list of possible mount points for the new partition appears.
- Select the mount point you with to use for this partition. Note that one (and only one) partition must be designated as the root partition, represented in the list as a forward slash (/).
- Click on the combo box labelled File system type. A list of filesystem types appears.
- Select the filesystem that you wish to have on the new partition:
- ext2
- The basic Linux filesystem.
- ext3
- An advanced Linux filesystem. The ext3 filesystem is designed to reduce reboot time and data loss after unexpected power loss.
- linux-swap
- Virtual (disk-based) memory.
- fat16
- An older Windows filesystem
- fat32
- A newer Windows filesystem.
Linux partitions must be set as either ext2 or ext3.
- All disks present in your computer are listed in the Device box. Click on the disk that you wish to create your new partition on.
- Decide how much disk space (in MB) you wish to devote to the new partition. Select Fixed size to use all available space, or click Use all space up to and enter the maximum size of the partition (in MB).
- The first four partitions on your hard drive may be Primary partitions. If you would like your new partition to be a primary partition, click the check box Force to be a primary partition.
- If you wish to scan the disk for hardware errors, select the Check for bad blocks checkbox.
- Click OK
To modify an existing partition:
- Click on partition in the Manual Partitioning window. The row you select will appear highlighted.
- Click on the Edit button. A window will appear allowing you to modify the partition's settings.
- Click on the combo box labelled Mount point. A list of possible mount points for the new partition appears.
- Select the mount point you with to use for this partition. Note that one (and only one) partition must be designated as the root partition, represented in the list as a forward slash (/).
- If you wish to leave the data on the partition intact, click the Leave unchanged radio button. Otherwise, if you wish to create a new filesystem, or format the partition, click on the Format partition radio button and select the filesystem to be installed:
- ext2
- The basic Linux filesystem.
- ext3
- An advanced Linux filesystem. The ext3 filesystem is designed to reduce reboot time and data loss after unexpected power failure.
- linux-swap
- Virtual (disk-based) memory.
- fat16
- An older Windows filesystem
- fat32
- A newer Windows filesystem.
Linux partitions must be set as either ext2 or ext3.
- If you wish to scan the disk for hardware errors, select the Check for bad blocks checkbox.
- Click OK
Automatic Partitioning
If you don't want to create partitions for LBA-Linux yourself, you can allow the installer to automatically make the necessary changes to your hard disk. The installer will examine your existing disk structure and determine an optimal partitioning scheme based on general instructions from you. You may choose to review the installer's suggested partitioning scheme before accepting it.
Automatic partitioning is recommended for beginners.
To select Automatic Partitioning:
- Click the radio button next to Automatic partitioning.
- Click the Next button at the lower right of the screen.
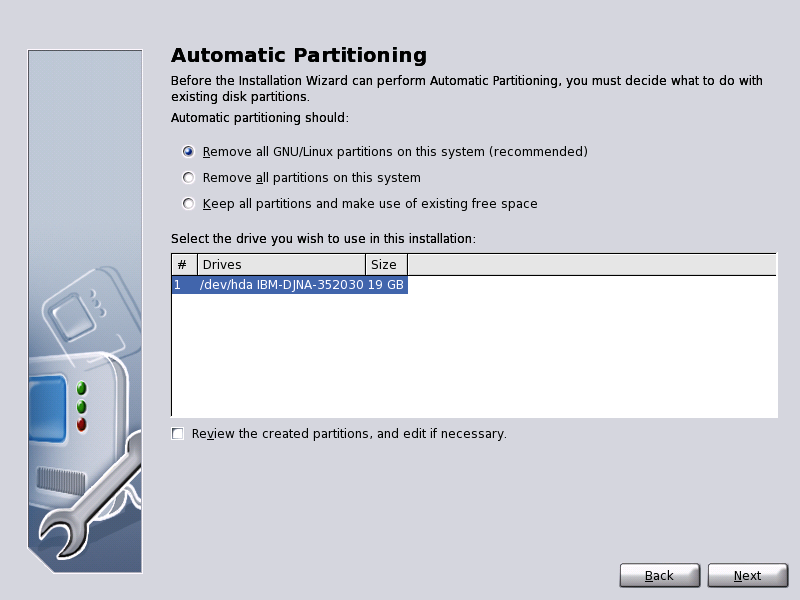
Before the installer automatically creates partitions, you must provide a general partitioning scheme. If your computer has more than one hard drive, you must select the one on which LBA-Linux will be installed.
Figure 4:
The Automatic partitioning screen of the LBA-Linux Installation Wizard
|
|
The LBA-Linux Installation Wizard provides three general partitioning schemes:
- Keep all partitions and use existing free space.
- The least destructive option, this scheme keeps all existing partitions intact and attempts to create a new LBA-Linux partition from free (unpartitioned) space on your hard drive.
- Remove all Linux partitions on this system.
- In this partitioning scheme, partitions belonging to any Linux operating system are deleted. Any data on these partitions will be destroyed. The Installation Wizard will then create a new LBA-Linux partition from the recently-freed space. Partitions belonging to non-Linux operating systems will remain unaffected and intact.
- Remove all partitions on this system
- . Partitions belonging to all operating system will be deleted, and a new LBA-Linux partition created from the freed space. Using this partitioning scheme will destroy all data on the hard drive.
To select a partitioning scheme, click on the radio button beside the scheme you wish to use.
The Installation Wizard can perform automatic partitioning over several hard drives, if your computer has more than one. Your chosen partitioning scheme will be applied to each hard disk you select for automatic partitioning.
Each hard disk detected by the Installation Wizard is displayed on the automatic partitioning screen, along with the size of the disk.
To select a disk for automatic partitioning, click the checkbox beside the name of the hard disk(s) you wish to partition. You may select more than once disk, if your computer has multiple hard disks. The same partitioning scheme will be applied to all selected disks.
You may wish to review the Installation Wizard's proposed automatic partitions before accepting them. This allows to you check and approve the new partition table before it is implemented.
To choose to review automatic partitions, click the Review automatically created partitions checkbox.
If you do not choose to review automatic paritioning, the partitions will be created silently and automatically.
Next: Bootloader
Up: LBA-Linux Installation Guide
Previous: Welcome screen
Contents
Index
2004-04-16